Showing posts with label Project. Show all posts

Sunday, May 20, 2012

Bedflower

As I couldn't find a decent and cheap lamp to attach to my bed as a reading light, I decided to build one.

I saved some deodorant bottles as they have a nice shape and can be used in some projects.
I noticed that some light bulb screw bases I had fit perfectly in those bottles.


For the neck I used wire wrapped in a long screw for shape and strengthened it with more wire inside to have a flexible but strong neck.


As a base I chose make it out of wood so I tried to saw some squares that would connect with a 45º angle cut, but the nails I have are to big for that cut and the wood block chipped.


Then I drilled the blocks to pass the lamp's neck and some screws that will be used to secure the base to the bed.


After some polishing,


I nailed the pieces together and polished again:


These are the switches I applied to make the wires from the base to the wall wart:


Then I secured the neck to the base using the neck wire and a nail to fixate it, and secured the electrical wire as well.


I connected the switch so that it covers the holes where the screws go into, making it more aesthetic.


And here are the screws applied to the base.


So were almost there.


To make it more appealing I covered the neck of the lamp in a painters tape.
It looks kind of pretty in this photo, doesn't it? Sadly, that's the only case...


So here's the end result.


In the end, I don't think this is much appealing or practical as it is.
I made lots of mistakes on this that I was able to correct and others that I couldn't.

But the main idea is solid and when possible I will make a better version of this.
---------------------------------------------------------------------------------

Time to some improvements!

The wood panels were too small and would easily come out of the bed, so I switched to some bigger ones. But now they are too big to be plain.

I decided to try a little design:


With a X-Acto I cut on the wood some leaf design I found on Google and with my old soldering iron burned the wood to create the pattern you see above.

But I didn't feel it was enough. The upper part was still ugly.
So I tried another artistic approach:


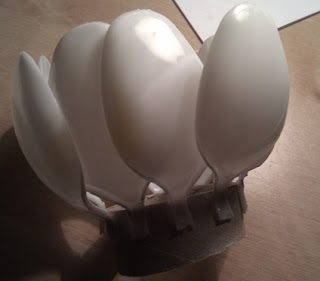
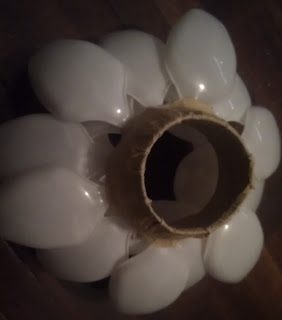
I bought some disposable table spoons (used about 30 for testing and the final look) and glued them to a piece of toilet paper roll.


After two layers of glued spoons, I added other two layers of bent spoons and covered the hot glue at the base with some painters tape to hide the mess.


The final result is a beautiful (I think) flower:


What do you think?

Thursday, November 17, 2011

First Hack - The LED Strip

Finally finished my first hack.

I needed a light for my kitchen counter, so I ordered a LED Strip from eBay and hacked an AC adapter to include an ON / OFF button and to connect it to mains without using a power socket.

So here's the theoretical work:

To cover the surface of my counter I used 48 segments of the LED strip (about 2 meters). Each segment has 3 white SMD leds (type 3528) and a 150 Ohm resistor. For it to work it needs a 12V power source with sufficient current output.
After learning from [ladyada] about these strips I figured that the theoretical current each segment needs to function at it's maximum is 16 mA. That is:
12V total - (3 leds * 3.2V) / 150R = 0.016A

For the total 48 segments that's 768 mA, resulting in under 10W lighting!!!
For that I bought a SMPS AC adapter in order to guarantee the regulated 12V while using that much current. An average (unregulated) AC adapter wouldn't provide nor the 12V neither near the maximum 1A stated. [ladyada] also shed me some lights on that matter.

White LED StripSuitable AC AdapterThe best switch button I could find

For the practical work:

As you will see for yourself, the tools weren't exactly the best suited for the job: a kitchen knife to cut, a soldering iron to remove plastic, a hammer and a nail to open holes...

The innards of a power outletMains power derivationAdhesive cable duct

In order to cut the space for the switch button in the AC adapter, my kitchen knife wasn't enough, so I used my soldering iron to heat a metal needle and a kind of a thick clip used by stores to keep shirts folded in it's package. Even so it was a hard work.

Pierced top cover from the AC AdapterCreating the space for the switch buttonThe working conditions

Then I just needed to solder the switch button and the wire to the board and cover it all with electrical tape.

The final cutConnecting the switch buttonThat's a wrap

And there we have it!
Our working LED Strip!


Tuesday, September 6, 2011

Project: NiteLite

Problem: I would like to be able to go to my kitchen at night without having to turn on the fluorescent ceiling lamp for a short stay.

Solution:
I will try to build a night light with a motion sensor to light some leds and a luminosity sensor to turn the device on only in the dark.

For me to understand better about circuitry I will avoid using micro-controllers as well.

More details in a few days...

Saturday, December 4, 2010

Big LED Matrix

In my last post I built a 5x7 LED matrix. After reading this hackaday article, I decided to expand my LED matrix to the most.


In order to reuse the board I had to grow on the columns, which are 7 leds each.
So I soldered 7 more columns to a total of 12. With the existing 7 rows, I will need now 19 pins of the Arduino, the same as in the Jack-o-lantern (14+5), but my matrix totals 84 leds, against 70 of the mentioned article.


As I'm lighting by column, I can send a current of 20mA for the 7 leds to total the same safe 140mA to the Arduino.

In the previous post I also mentioned the issue when each pin of the Arduino can only support a 40mA current. To solve it we need to connect transistors to the matrix cathodes, for diverting that current to a real GND pin. That way, the Arduino pins that were connected to the cathodes will now connect to the base pin of each transistor, and the other pins will receive the total column current and send it to GND.
Notice that the GND pins can only support up to 200mA.


There are two types of transistors we can use in this case.
Here's the basic lecture I read on their differences.
In this case the difference will be how to program the Arduino. Using NPN transistors means we need to set the pin to HIGH to light a led column, an using PNP transistors the pin has to be LOW.

I wanted to use PNP transistors because that way I could save my NPN for other projects. But after some tests on finding the best resistor to attach to the base, I didn't achieve any satisfactory result, in comparison to the currents I could obtain using NPN transistors.

According to the math, I should be using 100 Ohm resistors for each line, and 2.2k Ohm resistors for the base of each transistor, but after some tests with a multimeter, those numbers were quite different from the reality.
I ended up using 47 Ohm for the lines and 1k Ohm for the transistors.
[WILL TRY TO UNDERSTAND THIS BETTER]

I used a flat ribbon for the wires to the Arduino. The male connector soldered on the board may look as a tidy way to use, but it's a nighmare to solder the wires, so I wouldn't recommend to use it for this kind of amateur project...

To finish the hardware I applied hot glue on the connections for isolation and fixation.


Now it's time for the software...

//
// Controlo de uma matriz de LEDs 12x7
// thylux
//
int L01 = 4;
int L02 = 6;
int L03 = 5;
int L04 = 8;
int L05 = 10;
int L06 = 12;
int L07 = 11;
int C01 = A5;
int C02 = A4;
int C03 = A3;
int C04 = A2;
int C05 = A1;
int C06 = A0;
int C07 = 0;
int C08 = 1;
int C09 = 2;
int C10 = 3;
int C11 = 7;
int C12 = 9;

void setup()
{
  // Positivos
  pinMode(L01, OUTPUT);
  pinMode(L02, OUTPUT);
  pinMode(L03, OUTPUT);
  pinMode(L04, OUTPUT);
  pinMode(L05, OUTPUT);
  pinMode(L06, OUTPUT);
  pinMode(L07, OUTPUT);
  // Negativos
  pinMode(C01, OUTPUT);
  pinMode(C02, OUTPUT);
  pinMode(C03, OUTPUT);
  pinMode(C04, OUTPUT);
  pinMode(C05, OUTPUT);
  pinMode(C06, OUTPUT);
  pinMode(C07, OUTPUT);
  pinMode(C08, OUTPUT);
  pinMode(C09, OUTPUT);
  pinMode(C10, OUTPUT);
  pinMode(C11, OUTPUT);
  pinMode(C12, OUTPUT);

  //Serial.begin(9600);
}

int freq = 1000 / 600; // Hz
void loop()
{
  //char debug[10];
  
  // Demo
  for(int i = 1; i <= 12; i++)
  {
      for(int j=0; j<7; j++)
      {
        light(i, (byte) 2^j);
        delay(100);
      }
        
      //pot = map(analogRead(A0), 0, 1023, 0, 500);
      //delay(pot);
    
      //sprintf(debug, "i:%d j:%d", i, j);
      //debug[9]='\0';
      //Serial.println(debug);
  }
  
  int i=0;
  while(i<10000)
  {
      writeSymbol('a');
      i++;
  }
  
  i = 0;
  while(i<10000)
  {
      writeSymbol('b');
      i++;
  }
}

void writeMessage(char* msg)
{
  for(int i = 0; i < sizeof(msg); i++)
    writeSymbol(msg[i]);
}

void writeSymbol(char chr)
{
  switch(chr)
  {
      case 'a':
      case 'A':
        light(1, B1111100);
        light(2, B0010010);
        light(3, B0010001);
        light(4, B0010010);
        light(5, B1111100);
        break;
      case 'b':
      case 'B':
        light(1, B1111111);
        light(2, B1001001);
        light(3, B1001001);
        light(4, B1001001);
        light(5, B0111110);
        break;
  }
}

// Ilumina os LED indicados na coluna
void light(int column, byte data)
{
  reset();
  
  switch(column)
  {
      case 1: digitalWrite(C01, HIGH); break;
      case 2: digitalWrite(C02, HIGH); break;
      case 3: digitalWrite(C03, HIGH); break;
      case 4: digitalWrite(C04, HIGH); break;
      case 5: digitalWrite(C05, HIGH); break;
      case 6: digitalWrite(C06, HIGH); break;
      case 7: digitalWrite(C07, HIGH); break;
      case 8: digitalWrite(C08, HIGH); break;
      case 9: digitalWrite(C09, HIGH); break;
      case 10: digitalWrite(C10, HIGH); break;
      case 11: digitalWrite(C11, HIGH); break;
      case 12: digitalWrite(C12, HIGH); break;
  }
  
  digitalWrite(L01, data & B0000001 ? HIGH : LOW);
  digitalWrite(L02, data & B0000010 ? HIGH : LOW);
  digitalWrite(L03, data & B0000100 ? HIGH : LOW);
  digitalWrite(L04, data & B0001000 ? HIGH : LOW);
  digitalWrite(L05, data & B0010000 ? HIGH : LOW);
  digitalWrite(L06, data & B0100000 ? HIGH : LOW);
  digitalWrite(L07, data & B1000000 ? HIGH : LOW);
  
  delay(freq);
}

void reset()
{
  digitalWrite(L01, LOW);
  digitalWrite(L02, LOW);
  digitalWrite(L03, LOW);
  digitalWrite(L04, LOW);
  digitalWrite(L05, LOW);
  digitalWrite(L06, LOW);
  digitalWrite(L07, LOW);
  
  digitalWrite(C01, LOW);
  digitalWrite(C02, LOW);
  digitalWrite(C03, LOW);
  digitalWrite(C04, LOW);
  digitalWrite(C05, LOW);
  digitalWrite(C06, LOW);
  digitalWrite(C07, LOW);
  digitalWrite(C08, LOW);
  digitalWrite(C09, LOW);
  digitalWrite(C10, LOW);
  digitalWrite(C11, LOW);
  digitalWrite(C12, LOW);
}

Note:
During my initial tests I couldn't understand why the columns connected to pin 0 (RX) and pin 1 (TX) were always HIGH.
I found later that it was caused by turning on Serial communication with Serial.begin().
The Serial was used to send debug information to the computer, so if you try to debug my program don't be alarmed by some row/column of leds not behaving as intended.

Friday, November 26, 2010

LED Matrix

After a very frail Pringles Led Matrix that kept falling apart, I turned myself to a perforated board.
Better restart on the basics...

So I built a new 5x7 LED Matrix:

(Yes, this newbie is soldering on the wrong side of the board...
For all the other newbies that might let this one pass, those circles around the holes are to help soldering the components and should be on the lower side.)

I chose to use 7 anode rows and 5 cathode columns, for no particular reason.

To test the connections I used a 9V battery and a 220 Ohm resistor. That creates a current of 27mA during the test. My Leds support 30mA max, so it's fine for testing purposes.


As this matrix will be controlled by an Arduino, the circuit voltage will be 5V. So I soldered 100 Ohm resistors to the columns, so that at any given time the lit LED closing the circuit receives the datasheet recommended 20mA at 5V. I chose to connect the resistors with the columns because that way I would only need 5 resistors. I could connect them to the rows, as they would have the same effect on the circuit.


In order to connect the rows without touching the columns, I use a screwdriver to help me bend the ends.


This circuit has 12 ends, and all must connect to the Arduino. The simplest form to connect them is by linking each end to an Arduino pin. As the resulting circuit is still very frail and hard to manage, and I didn't have enough parts to make a better solution, I connected the Arduino to a breadboard so I could test the circuit.
You will notice a potentiometer also connected to the Arduino. I used it to control the refresh rate of the matrix, by defining the value passed to the delay function between each pass.


The hardest part was to connect the circuit to the breadboard, because I had very little space to maneuver the LEDs ends below the board. Also I only had some already cut wires (in groups of 5 for each length) for use with a breadboard, that are not fit for this kind of connections. As you can see I had to use two wires with claw ends for the two remaining pins. Connected to those claws are ends I had to cut of broken LEDs, in order to connect to the breadboard below.


Well now to program the Arduino:
//
// Controlo de uma matriz de LEDs 5x7
// thylux
//

void setup() 
{
// Positivos
pinMode(2, OUTPUT);
pinMode(3, OUTPUT);
pinMode(4, OUTPUT);
pinMode(5, OUTPUT);
pinMode(6, OUTPUT);
pinMode(7, OUTPUT);
pinMode(8, OUTPUT);
// Negativos
pinMode(9, OUTPUT);
pinMode(10, OUTPUT);
pinMode(11, OUTPUT);
pinMode(12, OUTPUT);
pinMode(13, OUTPUT);

//Serial.begin(9600);
}

int freq = 1000 / 600; // Hz
int b[5][7];
int pot = 0;

//   2   3   4   5   6   7   8 
// -----------------------------
// |7 1|6 1|5 1|4 1|3 1|2 1|1 1| 9
// ----------------------------- 
// |7 2|6 2|5 2|4 2|3 2|2 2|1 2| 10
// -----------------------------
// |7 3|6 3|5 3|4 3|3 3|2 3|1 3| 11
// -----------------------------
// |7 4|6 4|5 4|4 4|3 4|2 4|1 4| 12
// -----------------------------
// |7 5|6 5|5 5|4 5|3 5|2 5|1 5| 13
// -----------------------------

void loop() 
{
//char debug[10];

// Demo
for(int i = 1; i <= 5; i++)
{
for(int j = 1; j <= 7; j++)
{
light(i, j);
pot = map(analogRead(A0), 0, 1023, 0, 500);
delay(pot);

/*sprintf(debug, "i:%d j:%d", i, j);
debug[9]='\0';
Serial.println(debug);*/
}
}

int i=0;
while(i<1000)
{
write('a');
i++;
}
}

void write(char chr)
{ 
switch(chr)
{
case 'a':
case 'A':
b[0][0]=1; b[1][0]=1; b[2][0]=1; b[3][0]=1; b[4][0]=1;
b[0][1]=1; b[1][1]=0; b[2][1]=0; b[3][1]=0; b[4][1]=1;
b[0][2]=1; b[1][2]=0; b[2][2]=0; b[3][2]=0; b[4][2]=1;
b[0][3]=1; b[1][3]=1; b[2][3]=1; b[3][3]=1; b[4][3]=1;
b[0][4]=1; b[1][4]=0; b[2][4]=0; b[3][4]=0; b[4][4]=1;
b[0][5]=1; b[1][5]=0; b[2][5]=0; b[3][5]=0; b[4][5]=1;
b[0][6]=1; b[1][6]=0; b[2][6]=0; b[3][6]=0; b[4][6]=1;

}

for(int i = 1; i <= 5; i++)
{
for(int j = 1; j <= 7; j++)
{
if(b[i-1][j-1] == 1)
light(i, j);
}
}
}

// Ilumina apenas o LED indicado de acordo com a posicao na matriz
void light(int line, int column)
{
reset();

switch(column)
{
case 1: digitalWrite(2, HIGH); break;
case 2: digitalWrite(3, HIGH); break;
case 3: digitalWrite(4, HIGH); break;
case 4: digitalWrite(5, HIGH); break;
case 5: digitalWrite(6, HIGH); break;
case 6: digitalWrite(7, HIGH); break;
case 7: digitalWrite(8, HIGH); break;
}

switch(line)
{
case 1: digitalWrite(9, LOW); break;
case 2: digitalWrite(10, LOW); break;
case 3: digitalWrite(11, LOW); break;
case 4: digitalWrite(12, LOW); break;
case 5: digitalWrite(13, LOW); break;
}

pot = analogRead(0);
if(pot <= 0)
pot = 1;

pot = 1000/(600+(400/pot));
Serial.println(pot);

delay(pot);
}

void reset()
{
for(int i = 2; i<=8; i++)
digitalWrite(i, LOW);
for(int i = 9; i<=13; i++)
digitalWrite(i, HIGH);
}


This is just a basic program to try out the matrix. It lights only 1 LED at any given time and defines a very high refresh rate, so that to our eyes it would seem that all LEDs are on at the same time (persistance of vision - POV).
We use digitalWrite() to define if the pin(i) will provide 5V (HIGH) or act as GND - 0V (LOW).
To light a LED we need to HIGH the anode controlling pin and to LOW the cathode controlling pin.
With analogRead() we can read a number between 0 and 1023 from an analog pin, and with a potentiometer connected to it, we can physically control variables, as the delay between the lighting of a LED. For a friendlier range of values there is the map() function.

So after some programming this is the end result:


After some research for other Led Matrices on the web I found an interesting tutorial on hackaday. Now I will try to use more Leds on my matrix to make the best use of Arduino.
But there are some things to take into consideration...

My Led Matrix works because I'm only lighting ONE led a a time. If I tried to light more than two Leds in the same row/column at the same time I would burn my Arduino.
As you can see in the datasheet, each pin can only support 40mA. In lighting 1 Led, in this matrix, it creates a current of 20mA (as defined above). With 2 Leds lid, 40mA will run on the circuit.
As you probably can already tell, this current could be supplied by two different pins, but it would be received on another pin connected as output, or would use same input and different outputs. These pins are not real GND, only regular pins set at 0V to create the electron flow. And they can only support 40mA of it...

So to correct this issue I should be using transistors, but that I'll talk about in the next post (part 2).